Is There a Better Way? The question to keep asking yourself when using your tools
A lot of the tasks we perform on a computer are repetitive and come with a cognitive load. Minimizing this repetitiveness helps us stay focused and accomplish our tasks quicker. As developers, our main tools to get the job done are the OS, the browser, our editor of choice, and the terminal. Investing in those and molding them to your needs pays off.
As someone who spends most of their workday in front of a computer, I like to reduce visual clutter and to optimize workflows. For that reason, I’ve customized my computer and tools to suit me, from keyboard shortcuts, to simplifying the UI, up to customizing touchpad gestures.
This is the result of a constant, but passive, pursuit over the years for doing things in an easier, quicker, and mentally less taxing way. When repeating a task for a few times that I find too tedious, I tell myself: there must be a better way!
When observing other computer users, I’m often astounded how little they deviate from the typical point-and-click mode of using a computer—especially for peer developers. This goes from the simplest action such as switching apps, where they reach for the mouse to click on an icon in the dock, to more advanced tasks such as editing and navigating text where they only ever change or jump one character at a time.
In the following I’ll list a few examples I’ve observed others do over the years and how to—I believe—do it better. I understand that these suggestions might be opinionated and I don’t expect you to agree with me. Nonetheless, I hope this will motivate you to refine your workflow and hone your skills in using your tools.
Table of Contents
macOS
I’m a mac user and thus these examples and tips are specific to macOS. Nonetheless, the ideas behind them may apply to other OSs as well.
Menu Items and Keyboard Shortcuts
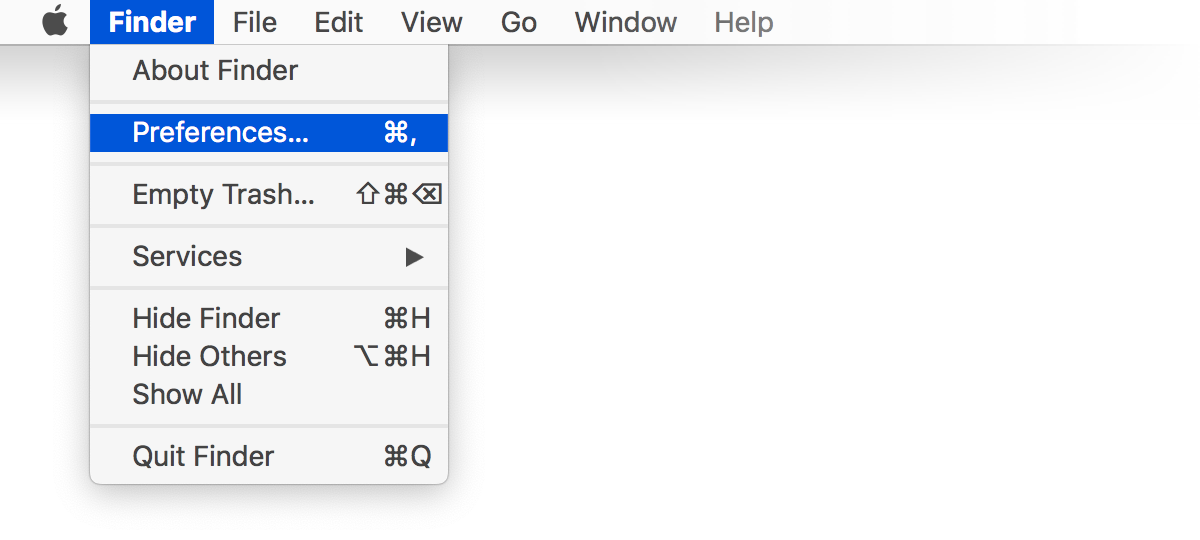
I’m always surprised when I see a fellow developer grab their mouse to click on one of the typical menu items for which there is a keyboard shortcut. New File (⌘N), Save (⌘S), New Tab (⌘T), Close (⌘W), Quit (⌘Q), Preferences (⌘,), these are all typically bound to the same keyboard shortcut across apps.
There’s no excuse not to memorize them. The menu even shows us the shortcut for the item:
If you want to get more out of the menu, macOS has a few tricks up its sleeve.
Sometimes you forget the shortcut for a particular menu item. Maybe you even forgot where that particular menu item is or you don’t even know whether a menu item for doing a certain action exists. This is where the Help menu comes in handy.
Suppose I’m in a graphics editor and I want to change a mask to use its alpha channel for masking. Opening the Help menu item and typing alpha will show me where the menu item is. I can also launch it conveniently from there by hitting return.
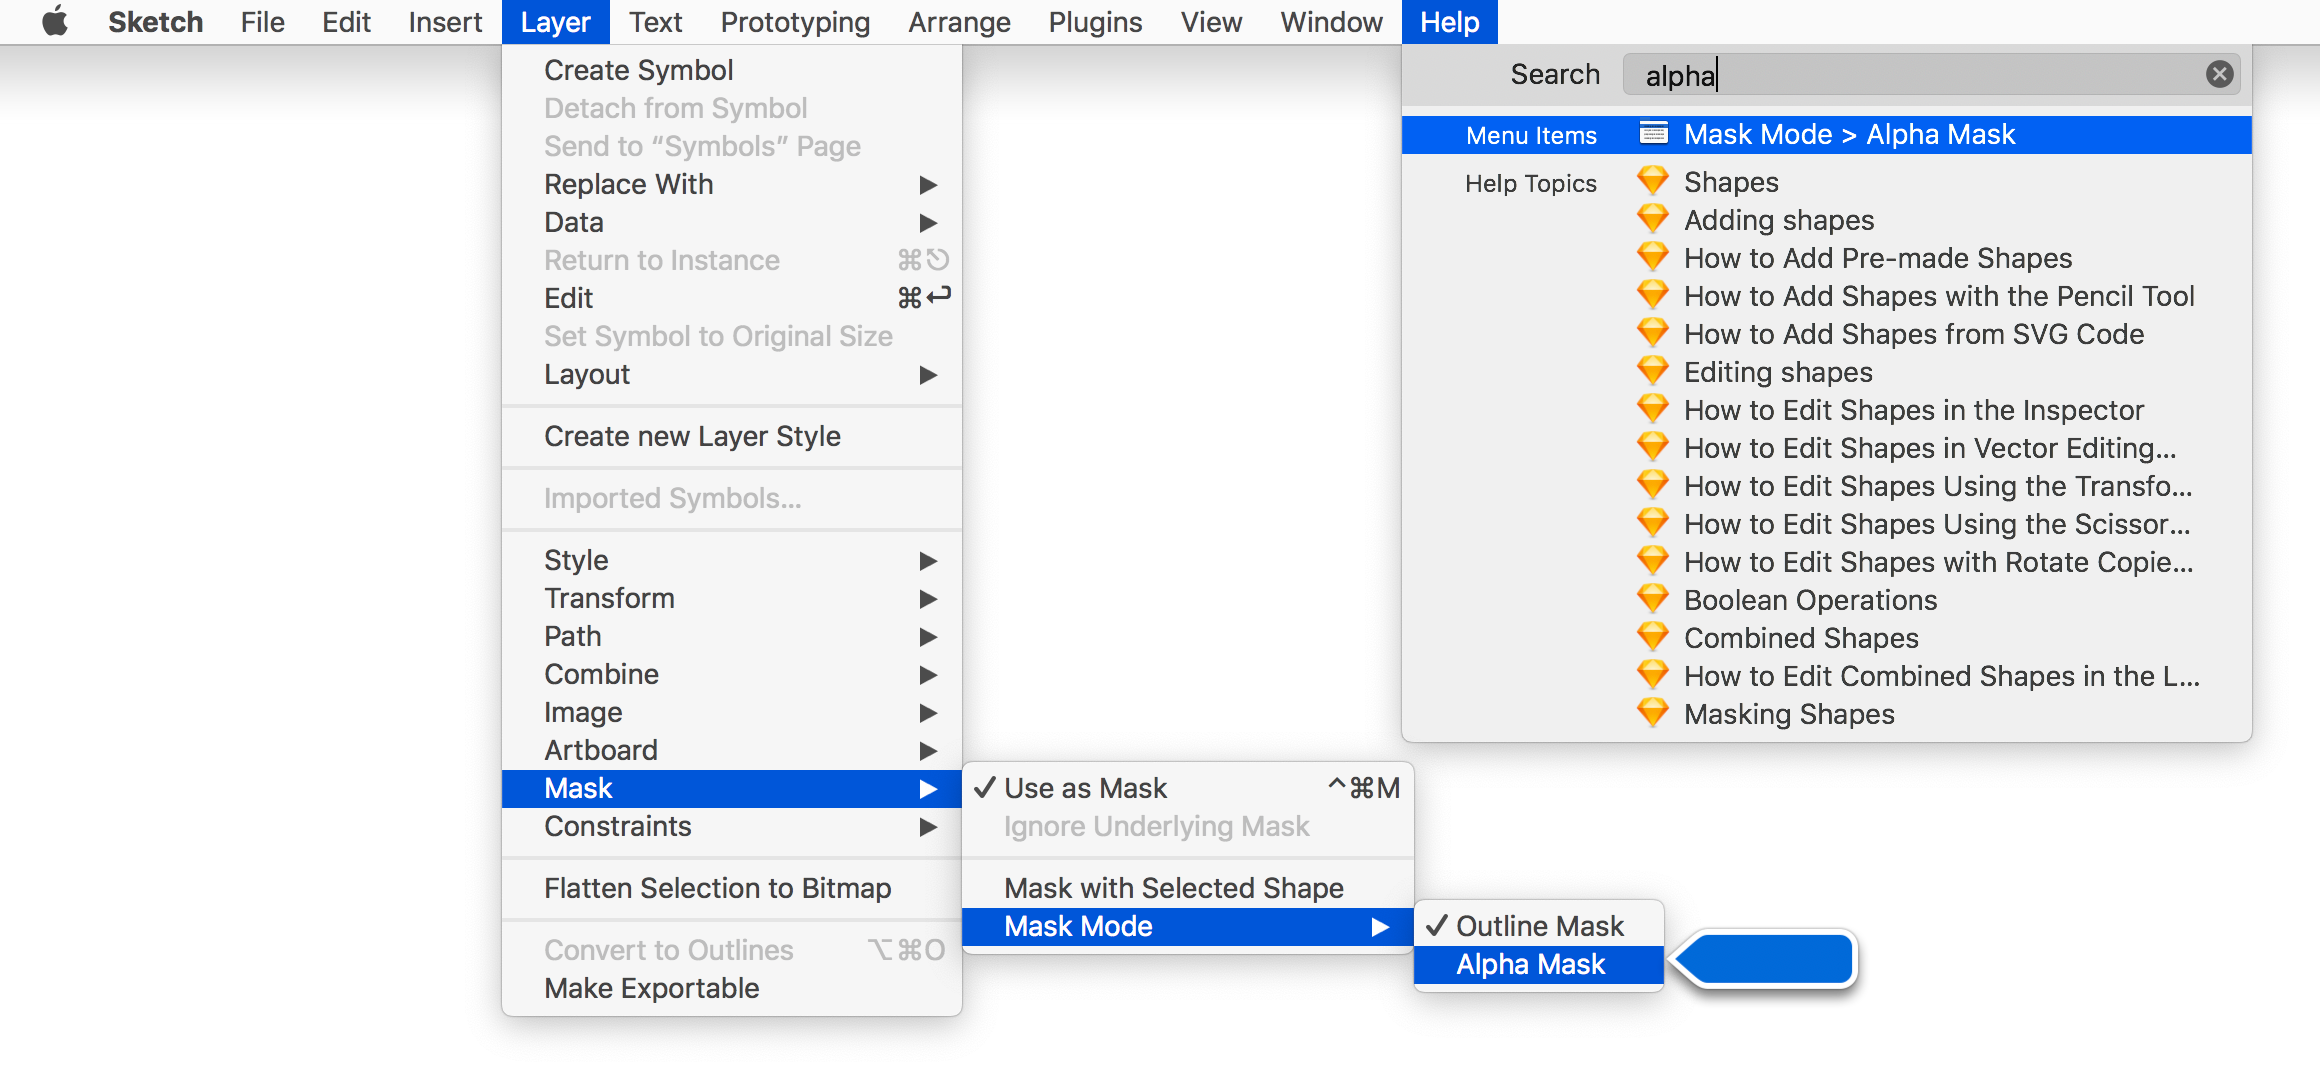
You can focus this search field in the Help menu item with ⇧⌘?, effectively turning it into a mini launcher for menu items.
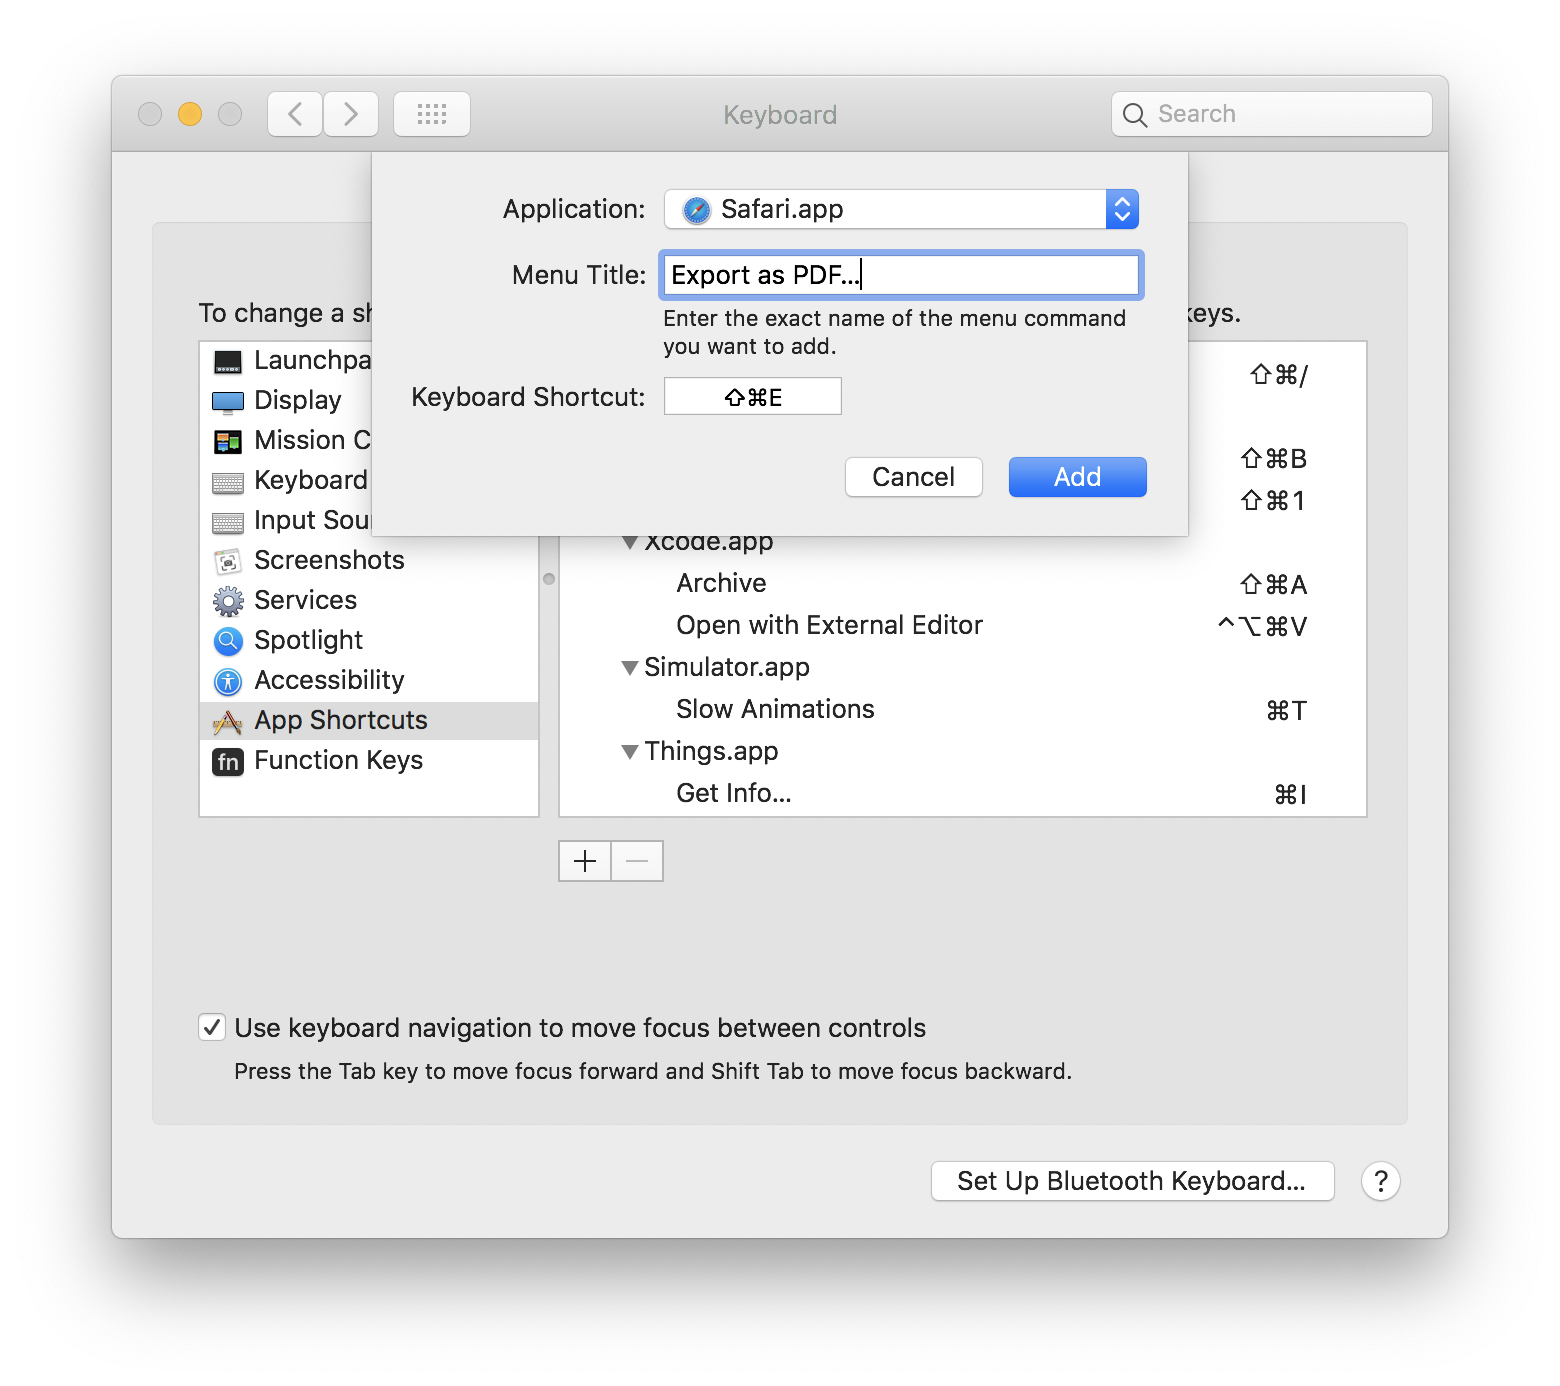
If you find yourself using the same menu item often, but that specific item doesn’t have a keyboard shortcut assigned to it, you can assign a custom one. This can be done in System Preferences in the Keyboard pane under the Shortcuts tab. Select App Shortcuts in the list and press the plus button. Now you can select the app, enter the menu item title for which you want to add a shortcut, and finally specify the shortcut. That menu item will now show your custom shortcut.
Here you can find an official and extensive list of generic macOS keyboard shortcut.
Switching Apps and Windows
One way of switching between windows and apps that I’ve seen people do surprisingly often is to move the topmost window slightly to the side in order to reach the window behind. The next best way is to click on an icon in the Dock, which brings to front the desired app, but not necessarily the desired window in case the app has multiple.
When I started using a Mac, I was a big fan of Exposé and Hot Corners. I still have my top right screen corner set to trigger Exposé for all apps and the top left corner set to Exposé for the current app. When I’m in mouse mode, that’s a great way to switch apps and windows.
Mostly I’m in keyboard mode though where I use ⌘⇥, i.e. Command-Tab, to switch apps. If you keep Command pressed after hitting Tab, the app switcher will stay visible:

Pressing Tab again moves the selection to the next app. Releasing Command will bring that app to foreground.
To move the selection to the left, hit the key ` (backtick) key located above Tab (or use the left arrow).
While the switcher is open, you can also quit or hide the highlighted app by hitting Q or H, respectively.
A key feature of the app switcher is that the apps are ordered by recency. Let’s say you’re composing an email in Mail. You might need to look something up in Safari so you hold Command followed by the number of Tab strokes required to select Safari. Mail is now located after Safari in the app switcher. Thus, to jump back to Mail, a single ⌘⇥ will take you there. This is so quick that the switcher won’t even show. Now Safari will be in second position, such that repeated ⌘⇥ strokes cause you to cycle between Mail and Safari.
Switching between windows of the current app is similar. In Mail you might need to switch between the compose window and the mailbox window. You can cycle between the windows using ⌘` (⇧⌘` in the reverse direction).
Window Manager
Fiddling with windows to move or resize them is another thing where I’ve told myself a long time ago that there must be a better way. The process of grabbing a window, moving it to a corner of the screen then dragging its opposite corner to resize it in order to maximize a window is as cumbersome as it can get. Another use case I see often is placing two windows side by side.
This is where a window manager comes in handy, which conveniently turns these manipulations into single clicks or key strokes. No more fiddling with windows and their edges.
There’s quite a few such window managers available for macOS. I started with SizeUp ten years ago, which worked great, but soon after switched to Slate, which offers more customizability and has some additional features. Slate barely has any UI, but is highly customizable using a text based config file (here’s mine in case you’re curious).
The typical things that I do with a window:
- maximize with ⌃⌥⌘M
- center with ⌃⌥⌘C, which causes the window to use ⅔ of the screen width and full screen height, useful for websites that don’t work well when too wide
- resize to the left half of the screen with ⌃⌥⌘H
- resize to the right half of the screen with ⌃⌥⌘L
- resize to the lower half of the screen with ⌃⌥⌘J
- resize to the upper half of the screen with ⌃⌥⌘K
- throw the window to the next screen with ⌃⌥⌘N when connected to more than one monitor
Hiding Unused UI
When looking at other people’s screen, I often wonder if the buttons present in the UI of apps they use are ever pressed by them. Apps by default come with a toolbar full of buttons, some more useful than others. In my opinion these clutter the UI unnecessarily, especially if you never press them.
For that reason, I like to customize the UI of the apps I use most. One such app is Mail. Except for browsing messages, I do most of the actions using keyboard shortcuts. For that reason, I don’t need any of the buttons in the toolbar that are shown by default.

I have removed every item in the toolbar except for the search field. Since the search field is only used occasionally, I also hide the toolbar entirely. I can focus the search field by pressing ⌥⌘F, which will reveal the toolbar temporarily until I clear the search.

The compose window is similar. The default comes with plenty of buttons that I don’t need.

All I want is an experience reduced to the max so I can focus on the message.
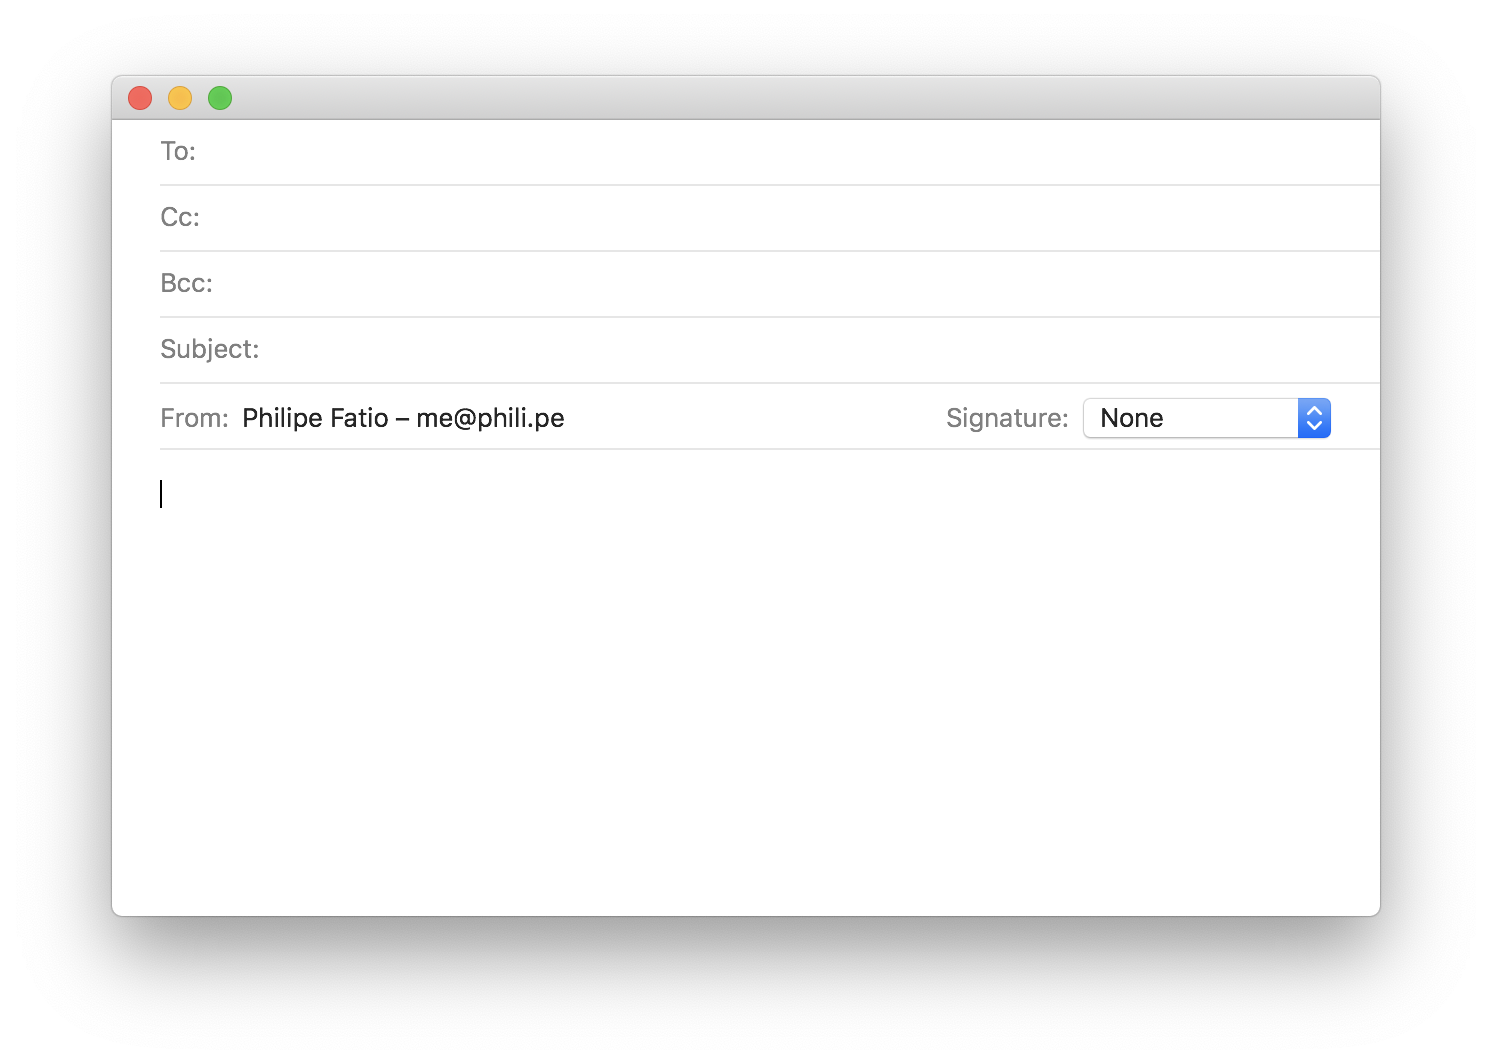
If I want to make something bold or italic, I hit ⌘B or ⌘I, respectively (these pretty much work globally on macOS). If I need a bullet list or a numbered list, I have my custom keyboard shortcuts ⇧⌘B and ⇧⌘1 for the respective menu items (see section above on how to add custom shortcuts).
Once I’m ready to send the message off, I hit ⇧⌘D (D as in deliver).
Cursor Movement and Text Selection
Countless times I’ve noticed that people don’t realize that there are more advanced ways to move the cursor in a text field or to select text than doing so character by character. It’s almost agonizing to see someone move their cursor by holding down ← or → for several seconds (if only they’d at least increase the key repeat rate) or to see them trying to select a word or range of words and missing a character or selecting one to many.
Selecting a single word is as simple as double-clicking it. To select a range of words, select either the first or last word by double-clicking it, then click the word on the other end of the range while holding down Shift. The following video demonstrates this:
As you see, no need for surgical precision with your mouse.
If you want to select an entire paragraph rather than a range of words, simply triple click on the paragraph.
Similarly, moving your cursor in a text field can be done quicker than character by character. While holding down Option you can press ← and → to move word-wise. To move to the beginning or end of the line, use ⌘← and ⌘→. The up and down arrows can also be used: ⌥↑ and ⌥↓ allow you to move by paragraph while ⌘↑ and ⌘↓ move the cursor to the very beginning and end of the field, respectively.
The above shortcuts can be combined with Shift to select text rather than just move the cursor.
Option and Command can also be combined with Backspace (i.e. delete to the left) and Delete (i.e. delete to the right): ⌥⌫ and ⌥⌦ delete the word to the left and right, respectively; ⌘⌫ and ⌘⌦ delete from the cursor position to the beginning and end of the line, respectively.
These days I prefer the Emacs bindings that also work globally on macOS. The reason is that I use these extensively in the terminal (as described later) where above shortcuts don’t work. Additionally, they allow me to stay on the home row.
The shortcuts are:
- ⌃B (back) to move left instead of ←
- ⌃F (forward) to move right instead of →
- ⌃P (previous) to move up instead of ↑
- ⌃N (next) to move down instead of ↓
- ⌃⌥B to move left word-wise instead of ⌥←
- ⌃⌥F to move right word-wise instead of ⌥→
- ⌃A to move to the beginning of the line (in contrast to ⌘← it uses hard wraps as anchors, not soft wraps)
- ⌃E to move to the end of the line (in contrast to ⌘→ it uses hard wraps as anchors, not soft wraps)
- ⌃H to delete to the left instead of ⌫
- ⌃D to delete to the right instead of ⌦
Clipboard History
Quite often the need arises to copy two or more bits of text to another place. Unfortunately, the clipboard only holds one copied value at a time. Thus, you need to switch a few times between the app containing the bits to be copied and the app where you need to paste the information until you’ve transferred the data.
This is where a clipboard history comes in handy. Instead of switching back and forth, copy the relevant parts, switch to the destination app, and retrieve the items from the clipboard history.
I use LaunchBar as an app launcher—basically a Spotlight on steroids. It comes with many useful features, including a clipboard history. Here’s a short demo on how a clipboard history can make your life easier:
A clipboard history is so essential to my workflow today that I can’t imagine how I worked without one for so many years. I recommend it to colleagues whenever I see them copy-pasting multiple times between two apps, and that happens quite often.
Web Browsing
The Power of Bookmarks
Navigating is the perfect example for reducing the number of steps to reach your goal. Countless times I’ve seen developers open github.com just to then search for a repository somewhere in a list, navigate to it, and then switching to the repository’s issues.
I used to be that person until I stopped for a second to realize how tedious this is and how long it was taking me. A simple bookmark could take me there directly. Placing a bookmark in your browser’s new tab view gets you a long way.
I’ve since taken this to another level. Now I have hierarchies of bookmarks for many services I use. For GitHub e.g. that would mean a GitHub folder with the pages and repos that I use regularly:
- GitHub
- Assigned Issues
- My Pull Requests
- My Issues
- Review Requests
- Projects
- organization/repo
- Home
- Issues
- New Issue
- Pull Requests
- …
I do the same for other services such as Basecamp or Trello.
With LaunchBar I can quickly open any bookmark without even switching to the browser first. The hierarchy allows me to drill down to the bookmark I’m looking for in case I don’t remember its title, which is useful for pages that I access less often.
It’s like navigating without waiting for the intermediate pages to load and without the clutter.
Predictable URLs
Navigating to URLs with predictable patterns is another area where a launcher can speed up things significantly. Let’s say you look up third party dependencies quite often. I do that e.g. for the Ruby language where a package is called a gem. Instead of opening my browser and googling rails gem, I’ve set up a search pattern in LaunchBar. I trigger LaunchBar, search for the RubyGems action by typing gem, type in rails and hit return, and https://rubygems.org/gems/rails opens in the browser.
This also works great for the search functionality of any website.
Text Editors
Many text editors and IDEs share a few fundamental features that are often even bound to the same keyboard shortcuts. I’d like to highlight two such features here that I’ve often seen neglected by other developers.
Personally, I used to be a TextMate user until I switched to Vim about eight years ago. With TextMate I did learn quite a lot of great features that, if I’m not mistaken, were copied or at least inspired similar features in other editors. Because of this and the fact that I still know most shortcuts by heart, I quickly find myself at home for basic editing and navigation in other editors.
Jump to File
Some developers like to navigate to files by looking them up in the editor’s file tree. I get that some people have a visual memory. But when all you want is to jump to the file app/models/user.rb, why would you look for a folder, expand it, look for the next folder, expand it, and finally look for the file user.rb when you can jump directly to it with a few key strokes?
This is where TextMate’s Open Quickly…, bound to ⌘T, really shines. If I’m not mistaken, this also works in Sublime Text and Atom. Type user and hit return and you’re in that file. If there are multiple matching files, type a few characters more or select the correct one in the list.
The search is typically fuzzy, meaning you don’t have to type all the characters in the sequence as they appear in the path name. Depending on how the fuzzy matcher works, you might be able to type less characters. E.g. if a file is called user_profile_controller.js, the initial character of each word, i.e. upc, might be enough to get this file as the top matching result.
Other fuzzy matchers, e.g. fzf, allow you to refine your search by typing a space and more characters, effectively filtering the obtained list. For instance, let’s say you type user and the following list appears:
tests/user_test.rblib/user.rb
If you append another word such that your search now says user lib, the list will be narrowed down to just lib/user.rb. The great thing about this is that it doesn’t have to be in the order that the words appear in the path (notice how lib comes before user in the path).
Jumping to a file is just the beginning. Once this is your default way of moving around, you might want to start looking at jumping directly to symbols (aka tags), e.g. classes and functions.
Line-wise Editing
Another concept that I learned to appreciate in TextMate—and is omnipresent in Vim—is line-wise operations. I’d claim that most developers don’t know the definition of a line.
A line is everything from the left edge of the text area (not where the non-whitespace starts) all the way to the end of the text including the newline.
When I observe people moving around lines of code, this lack of understanding results in plenty of fiddling with whitespace, like dramatized in this video:
Granted, this video shows a simple text editor. Most editors anicipate what you’re trying to accomplish by indenting your code and more. Still, from my experience there’s often some manual clean up needed.
On the other hand, if you use line-wise selection by triple clicking, you can cut and paste that line much easier:
Some editors also allow you to select an entire line with a keyboard shortcut so you don’t have to reach for the mouse. Also, there’s often a shortcut to move one or multiple lines around without cut and paste.
Terminal
For some, the terminal is their primary tool to get work done—like me. Others avoid it and prefer a GUI whenever possible. Even then, probably you still have to use it occasionally for certain tasks.
Thus, why not invest a bit in this tool to make your life easier?
Note that in this section I’ll be using the Emacs-style notation for keyboard shortcuts. To quote from Bash’s manual:
Control keys are denoted by C-key, e.g., C-n means Control-N. Similarly, meta keys are denoted by M-key, so M-x means Meta-X.
When I see others use the terminal, most move around the command line character by character. It certainly isn’t obvious how to move the cursor around other than using just the left and right keys. Often the person at least knows C-a and C-e to jump to the beginning and end of the line, so they jump to the closest end and then move from there to the place where they want to edit the line.
There are plenty of keyboard shortcuts that will make this so much easier. In fact, these shortcuts work pretty much on every command line, i.e. in your shell as well as in REPLs.
GNU Readline is what powers these interactive command lines. Because of that, you only need to learn the basic commands once in order to use them in (almost) all shells.
Here’s a short list of the most important ones (you’ll notice that they’re very similar to the shortcuts I’ve shown in Cursor Movement and Text Selection):
- C-a: move to start of line
- C-e: move to end of line
- C-b: move one character to the left (same as left arrow, but without leaving the home row)
- C-f: move one character to the right (same as right arrow)
- M-b: move one word to the left
- M-f: move one word to the right
- M-DEL: delete word to the left
- M-d: delete word to the right
- C-k: delete to the end of the line
- C-u: delete to the beginning of the line
- M-.: retrieve the last argument of the last run command
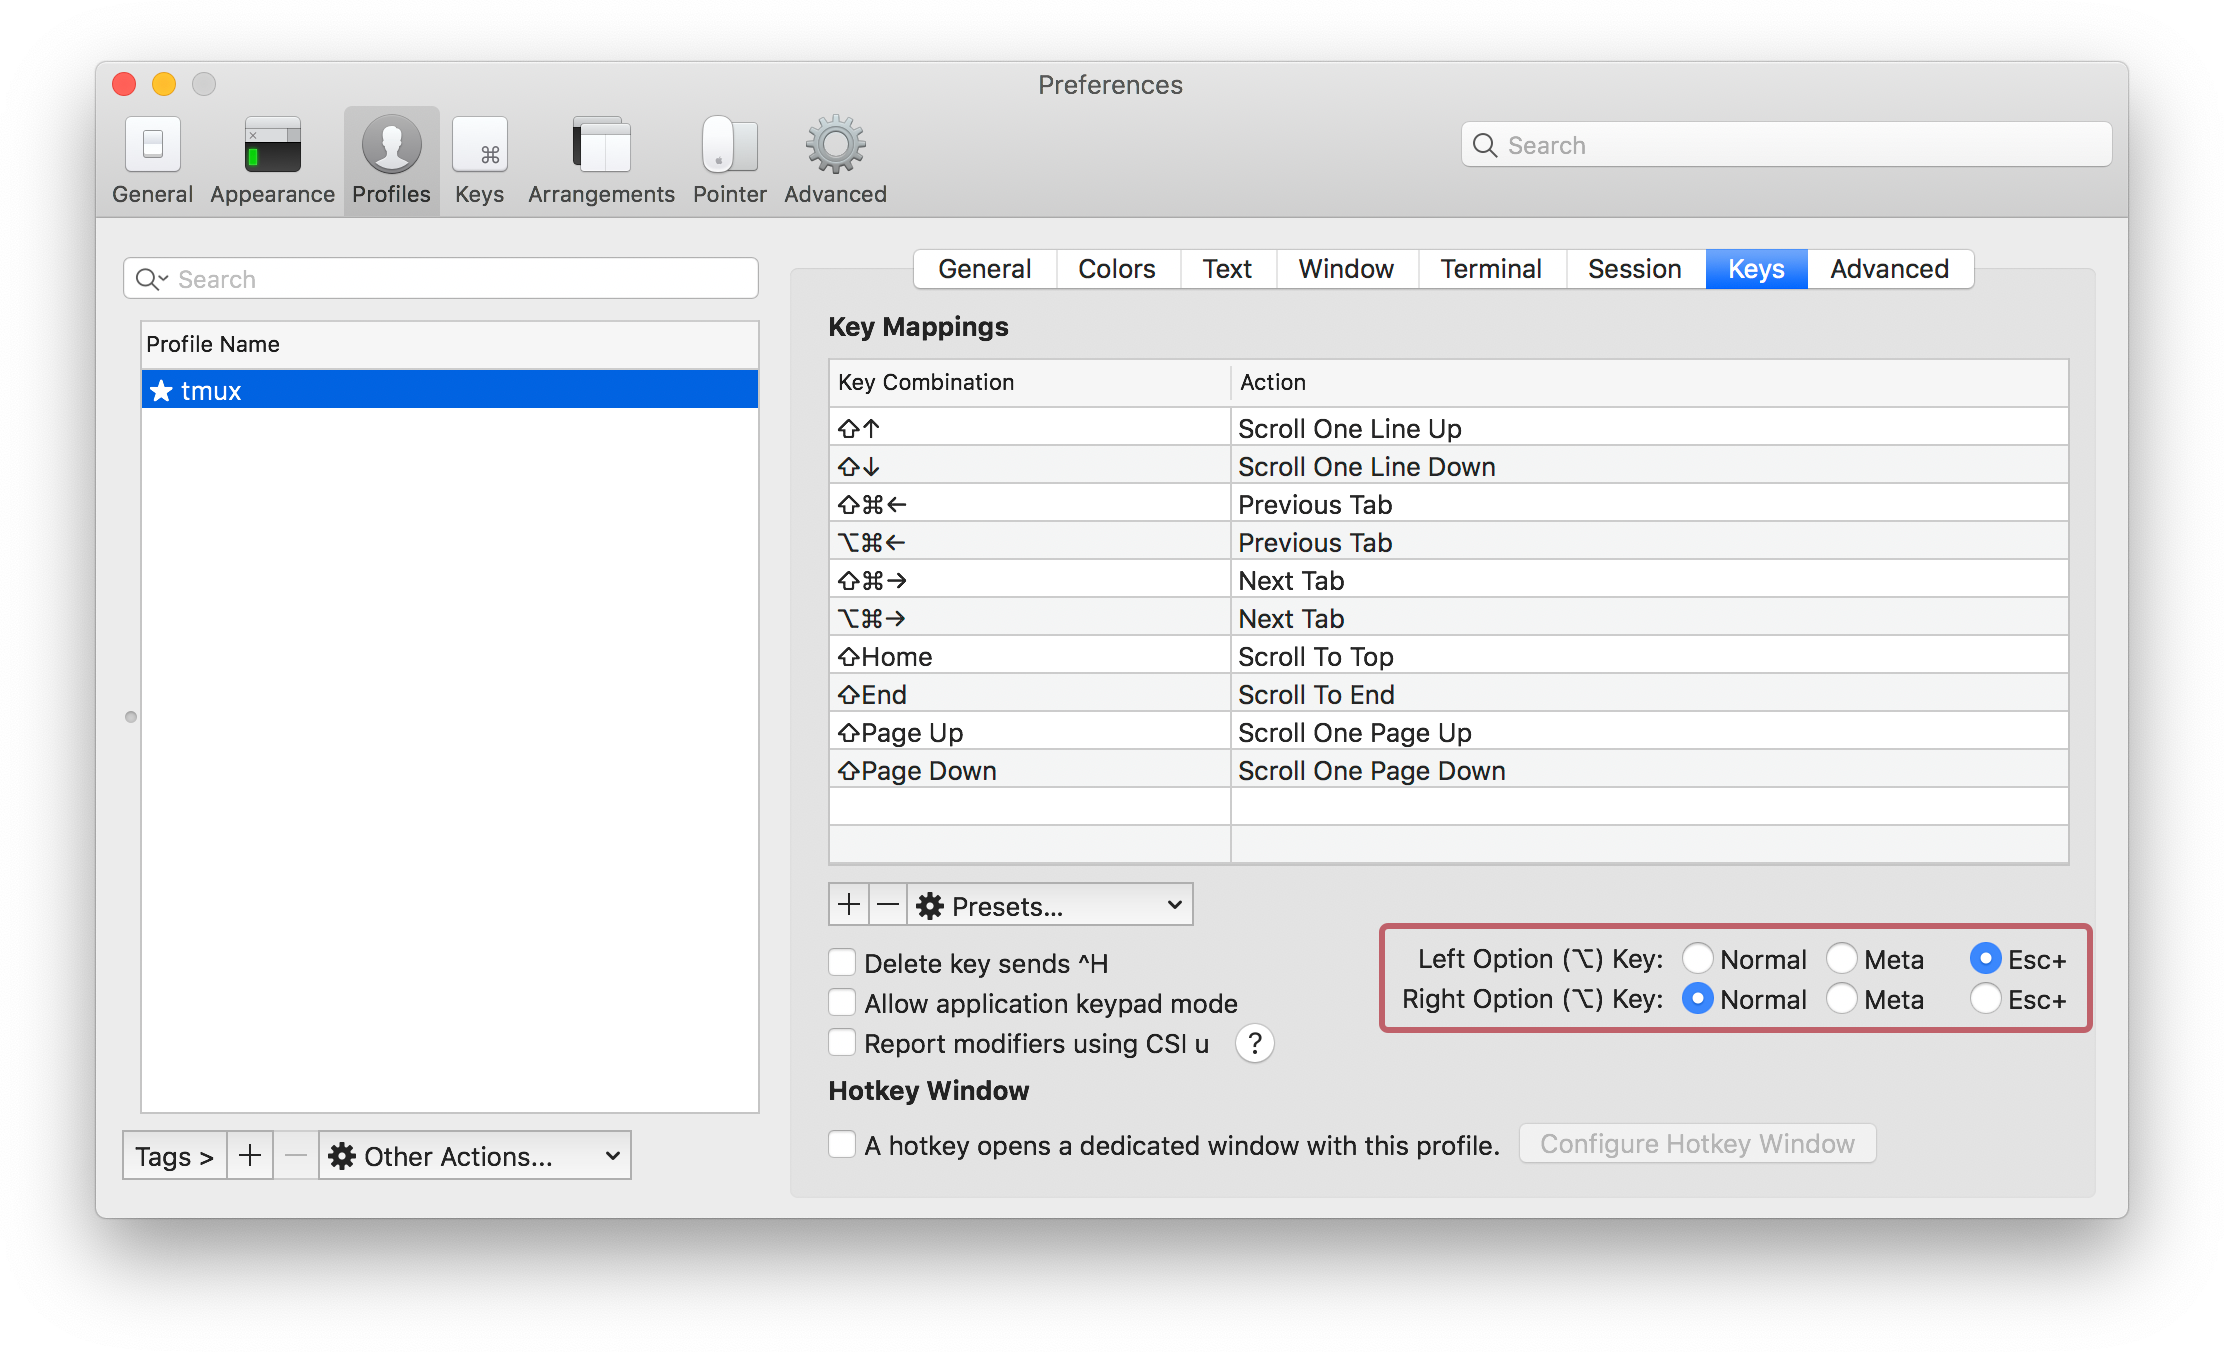
In order to leverage the shortcuts that use the Meta key, such as M-b, you probably need to configure your terminal emulator to use the Alt key as Meta. In macOS’s Terminal app that setting is located here:

If you happen to be an iTerm user, it offers the option to map the left or right Alt key. This has the benefit that you can still use the other for typing special characters. Make sure to choose Esc+ rather than Meta:
I encourage you to explore these shortcuts. There’s many more that also interact with Readline’s own clipboard, the so-called kill-ring, allowing you to move arguments around without having to select and copy them first. Other shortcuts for instance allow you to change the casing of a word.
The Wikipedia page on GNU Readline has an extensive list of shortcuts. I also recommend this cheat sheet.
Touch-typing
I believe that touch-typing is a skill absolutely worth learning if a computer is your main work tool. Hunt-and-peck might get the job done and you might even be fast at it. Heck, you might even be able to do it without looking down at your keyboard. Though from my experience while observing other developers that don’t touch-type, the error rate is quite high, especially when not looking at your keyboard.
I had taken a touch-typing class in high school, but it didn’t stick. There was a competition among mostly male students to finish the exercises as quickly as possible. Of course we’d all hunt-and-peck to win.
When I started my first day job as a developer, I realized that I needed to take typing seriously and force myself to learn to touch-type, even if that meant being slower initially.
I used a free app to learn the basics. From there, I simply forced myself not to look. If I didn’t remember where a key was, I could look down. Yes, I was slow as heck in the beginning, but it totally paid out. My wife did the same a few years ago approaching her thirties, so I’m sure it’s never too late.
One might argue that at the end of the day you might not necessarily be faster at accomplishing your work by optimizing your workflow. Depending on the nature of your work, solving a problem in your head might be the lion’s share of your day, while its execution with your tools constitutes a fraction. By optimizing the execution, though, I’m confident that you can reduce the cognitive load of it, allowing you to keep focused on the underlying problem or idea, thus reducing the chance of distractions. That in itself is already worth it.
Therefore, I encourage you to stay curious about your workflow and tools. Try to notice patterns and then ask yourself: is there a better way? Google for what you’re trying to accomplish.
Further, invest in your tools. Occasionally read their docs and browse their menus and settings. That way I’ve come across features I didn’t know existed. Having them in the back of your head will cause you to go: wait a second, wasn’t there this feature that would accomplish what I’m doing, but much quicker?
And for those that say “I can’t memorize shortcuts or commands”, write them down on a piece of paper and leave them somewhere visible close to your screen. The act of writing them down might already cause you to memorize them. If not, next time you need that one shortcut, glance down. After a few times you’ll know it by heart.
I like to observe how others work and learn from their unique setups and workflows. If you have a tool or tip you’d like to share, I’d love to hear from you.